November 30, 2014

It has been a while since the last post, so I thought I'd share an update on my China Basin project.

A few weeks ago, I had a few hours to play with the Epilog laser cutter at TechShop San Jose.  My first attempts at laser cutting after a year or two away from the machine served as an opportunity to re-learn the practical limits of laser board on the heavily used machines.

I tried cutting some of the superstructure and gears, but ended up with parts that were burned and fragile— I had forgotten to consider the thickness of the laser beam itself.


After tweaking the CAD a bit, I increased some of the dimensions, ran a few more cuts, and ended up with a pile of laserboard widgets to play with.  I had to head home, as my two hours of reserved time were over.


After playing with the parts, I had decided that there was no good way to build a "fold-up" model of the gantry crane.  I also had my doubts about the strength of the resulting construction, as this would eventually end up on a Free-moN module.

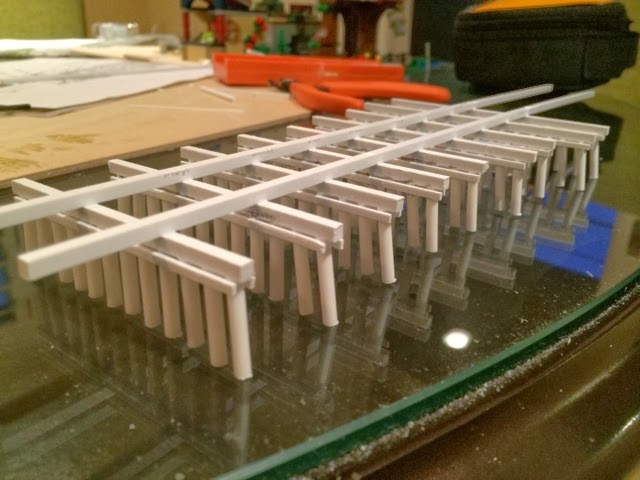
A few days later, resigned to the concept that I may need to abandon the laser, I started playing with Plastruct parts.


While the model was sturdy, it looked a bit too "beefy" for my taste— as I was starting to consider building the latticework on the front face, I stumbled upon another idea.  I had posted the work in progress to the Model Rail Radio Facebook group, and Jimmy Simmons said it looked good, but he'd stick to his laser.  Then it hit me— why not combine the two techniques.

As part of the earlier laser cutting attempts, I ended up with a few individual pieces that might work:


As a quick hack, I decided to glue up the laser cut faces to the plastic, and the results were quite pleasing to me:


I was psyched— a few weeks of the project sitting on the back shelf inspired me to get back into it.  The next step was to try out the gluing up multiple laser cut parts into the large pulleys used at the top of the gantry:


Some good progress on the difficult bits inspired me to get back to building more pilings, and the test fitting the works on the dock:


All in all, it was a productive Thanksgiving weekend— I hope to make more progress during Christmas break when I'll have more time to devote to the project again.

November 3, 2014

Ferry Slip Update

Had a chance to work on paper mock-ups for the "business end" of the ATSF slip.  Initial paper models were a bit too small, and didn't have enough clearance, but after working with the "full scale" drawings and my NMRA gauge, I think I have the right "look":


Spent some time learning how to vaporize laser board at the TechShop— it is going to take a few more hours to learn what I can get away with.  Here is a look at what happens when you try and cut things that are a bit too small:


Planning on going back for more learning/punishment next weekend to dial in the settings and tweak the CAD a bit.

September 28, 2014

Phone Booths

Added a quick coat of paint over the black primer to Robert's SLA phone booths:


Look forward to installing these line side next Friday.

September 27, 2014

More Car Float


Got a chance to add a few more layers of weathering, touched up some of the metallic details, and took a couple of shots before packing it in for the night.

I'm really happy with the way this is looking— next step will be detailing and adding the pilot house.


Car Float Progress

Had some time this weekend to do some painting!  I started by base coating the model with Citadel "Chaos Black":


I followed up with an uneven overspray of Tamiya Dull Red, and a few washes of Citadel colors to vary the tone:


Phone Booths

My buddy Robert gave me a few of his home-SLA printed HO Scale Southern Pacific Telephone booths.  They will find a home at Silicon Valley Lines.


September 15, 2014

Paper Layout

With some professional deadlines met, I had some time recently to get back to the China Basin project.  My challenge was to create a plan which would fit into my rather compact car.  This meant breaking up the design into sections no wider than 36", and 2'x3' would be best:


As soon as I had a design that I liked, it was time to print out a full-scale version to check things out:


One of the best things that doing a full size printout gets you is that you can "play test" using equipment and check to see if the track work will actually fit.  Part of the learning process was understanding how the CAD package representation of a switch played out with the actual FastTracks turnout templates I was planning on using— the photo below shows pretty clearly that I'm best sticking with very tightly trimmed #6 switches (I had hoped to "goose" #7 turnouts instead):


Another discovery of this experiment was that the fouling point of each yard track needed to be about 1" in from where the track became parallel.


The finalization realization was the need to construct 40+ #6 turnouts.  I'm telling myself I GET to build them.

September 1, 2014

TurNouts

Thanks to the start of College Football, I finally got into "assembly line" mode building with FastTracks assembly jigs. These turnouts will be part of the Christopher and Luchessa blocks on my friend's layout.  I still have one more #12 to build, but it is getting too late.

#10s and #12 N-Scale Turnouts

June 30, 2014

More Construction Progress

Got a few hours this weekend to continue working on my model of the dock.  Made some minor adjustments to the previous built section (cutting and re-fitting), and hunkered down and fabricated the long single track section of the structure:

New section of the dock

Overall View of the project so far

June 18, 2014

Sizing up the Dock

Spent some time tonight playing with a scaled up blueprint of the ATSF China Basin ferry slip.  As a result, I'm going to tweak the dock build a bit and even shorten the moving element of the float bridge.  It is pretty close, and matches nicely with the NScaleShips float barge.


June 7, 2014

DCC Shield

When I first was getting into Arduino, one thing I always wanted to do was create a DCC-controlled Arduino project, but my day job has been pretty much all-consuming.

I ran into my buddy Kevin a few years back and he was thinking the same thing— so I drew up a quick circuit for him to try:


My buddy Kevin beat me to the punch by creating a DCC_Decoder library and DCC_Monitor example sketch:


Fast forward a few years, and I managed to design a shield version of the circuit when I had some vacation time stacked up.  A few weeks ago I got my PCBs and spent about an hour this weekend putting together the first prototype:


After some fumbling with the attachInterrupt API (I'm using a Leonardo), I'm now decoding DCC packets:


May 27, 2014

Float Progess

More progress on the ATSF Float and Apron:


Car Float and Slip


Triple Track Slip Detail (PCB+Scribed Fill)


Slip and Float Interface (Rails on Barge Not Yet Secured)


March 19, 2014

Scott's State Belt Module

My friend Scott Forrest is building a Free-moN module based upon the area around Pier 43.  Here is a picture of his latest progress.


Flotsam and Jetsam


February 14, 2014

Float Update


ATSF Car Float kit arrived, now the rest of the dock can be built to match.

February 11, 2014

February 9, 2014